Create Data Instance via upload
If you chose "Create via Upload" as described in the Data Instances article, you will go through the steps defined in this article.
With this option, you are able to upload an excel file and create multiple Data Instances.
Once you've clicked "create via upload", you are taken to the next step where you are prompted to upload a file. as shown below.

- Drag and drop your file or click "browse" to select the file you wish to upload
- Once you have selected the file, the system processes it.
If the file is a valid format, the system will take you to the field Mapping step as described below.
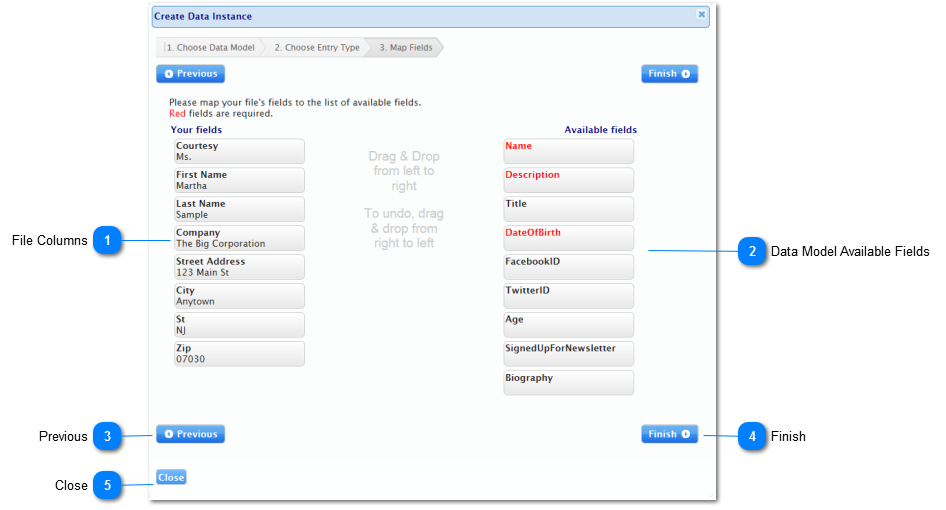
Field Mapping
Here ContentWelder will ask you to map the columns from your file the selected Data Model fields.
| Name | Description | |
| 1 | File Columns |
On the left hand side, you will see the list of columns from your file. The first Row in your file is the column Header So in this case the first row in the uploaded spreadsheet contained fields named "Courtesy, First Name, Last Name, Company etc." Beneath each column header, the second row of data is displayed. |
| 2 | Data Model Available Fields |
On the right hand side, you will see the list of available Data Model fields Fields highlighted in red are required |
| 3 | Previous | Click to go back to the previous step and choose a different way of uploading content. |
| 4 | Finish |
Click to complete your mapping If you click before mapping all required fields, the following error is displayed. 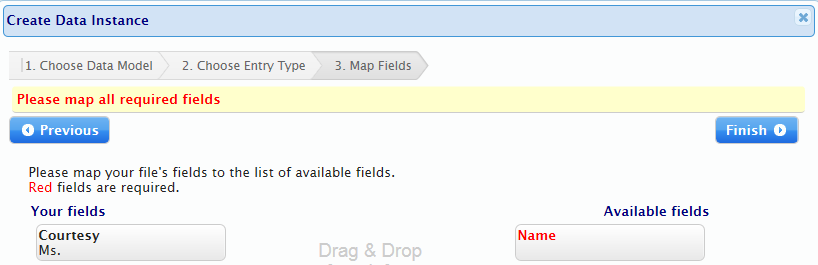
|
| 5 |
Data Type Data Validation
Since the creation of data instance based on files happens behind the scenes, errors are as evident as when you enter content manually. below is a description of the data type validation logic and how it works with file uploads.
Validating Required fields
Required fields are the first to be checked for both their existing as well as for data type validation.
Note: Remember, in a spreadsheet just because the first row has all the required fields filled out, doesn't mean row 423 does as well
- If a required field is missing
- The row is ignored and the system moves onto the next
- Or if a field's data type doesn't match the one defined in the Data Model
- The row is ignored and the system moves onto the next
- Or if a Data Model has a "length" defined and the field violates this length
- The row is ignored and the system moves onto the next.
In short, required field must be valid otherwise the entire row is ignored.
Validating non Required fields
- If a field's data type doesn't match the one defined in the Data Model
- The column is ignored and will not be updated
- Or if a Data Model has a "length" defined and the field violates this length
- The column is ignored and will not be updated

©2022 DeskNet Inc.
Proprietary and Confidential Information