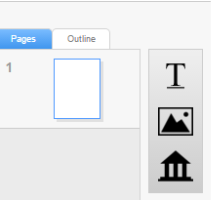
Pages
Access Pages
To access Pages in Designer, click on the Pages tab in the properties panel, as shown below.
The pages of your document contain the information that you wish to present to your end users in the Wizard, and ultimately have produced in your document.
Note: By default, a document must always have at least one page. Therefore, the first time you create a blank Personalized Catalog Item, you will see at least one page in your document.
Add a Page
Follow the steps below to add a page to your document:
- Ensure the Pages tab is selected in the page navigation panel (it is by default).
- Right-click a page in the Page navigation panel and the following menu will appear.

- Choose the Add Page After option.
- Once the Add Page After option is selected, the dialog box below will appear. Select the type of page you will add from the options shown below.
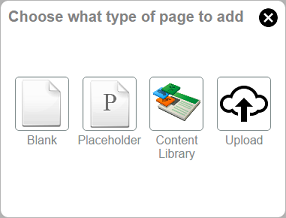
- To configure a blank page, click on the Blank option.
- Your page navigation panel should now have two pages displayed, as shown below.
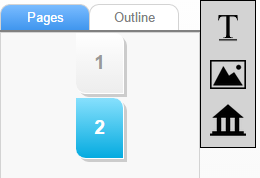
- You can now add as many pages in your document as needed.
Note: Changing Page Sizes
By default, new pages have the same dimensions as the current page being displayed. To change the dimensions of a page, select the desired page, then go to the properties panel and change the Height & Width values.
Understanding Page Type Options
As mentioned above, you have the option of adding different types of pages.
| Page Type | Description |
| Blank | This options will add a new blank page to your document. |
| Placeholder |
A page placeholder allows you as an Administrator to specify which parts of your document your end users can insert pages. Example Pitch books typically have a certain number of preset pages that you don't want end users to modify. However, there are certain parts within the Pitch book that you wish to allow your end users to personalize by adding content. A page placeholder allows your end users to do this. |
| Content Library |
This option opens the document content library. The content library contains all documents uploaded in the system by you and other Administrators and are referred to as "Shared Documents". Choose this option if the page you wish to add was previously added as a separate document. Pages added to the document from the content library cannot be modified. |
| Upload | If you know you need to upload documents, this option offers a quick way of doing so without having to go through the step of first choosing" Document Library". |
Page Properties
To access the Page properties, click on the left most tab in the properties panel, as shown below.
The tab name will reflect the name of the page. By default, all pages start with the name "New Page".
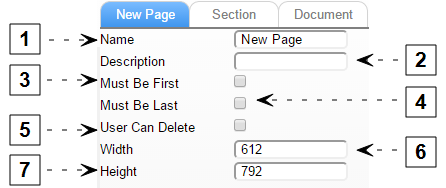
| Name | Description | |
| 1 | Name |
The name of the Page. Change it here and see the tab name change to reflect the new page name |
| 2 | Description |
A description of the page. These descriptions are not presented in the Wizard. However, if there are multiple people on your team configuring documents, filling out a description will help others understand the intent of your section(s). |
| 3 & 4 | Must be First and Must be Last |
Must be First This options is only available if the current page is the first page. When combined with the "can move pages" setting in the Document or Section properties, this property prevents users from using drag and drop feature to move a page that must be first to become the second page. Must be Last Just as "Must Be First" is only available if the current pages is the first one. "Must Be Last" is only available if the current page is the last page. Its function is to ensure the page is always the last one in the list. |
| 5 | User Can Delete |
If enabled, this option will allow users, in the wizard, to right-click to remove this page. This allows you to offer recommended pages to your audience without making them required. |
| 6 | Width |
The width of the current page. This option is only available for "Blank" pages |
| 7 | Height |
The Height of the current page. This option is only available for "Blank" pages |
Note: All dimensions are shown points. (72 points to an Inch).
Shared Document Properties
Shared Documents have the same set of properties as Blank pages with the exception of the following:
- Height
- Width
See the Shared Document topic for more information.
Page Placeholder Properties
The first few properties for page placeholders are identical to those defined above. A few additional options are available for the page placeholder, as shown below.
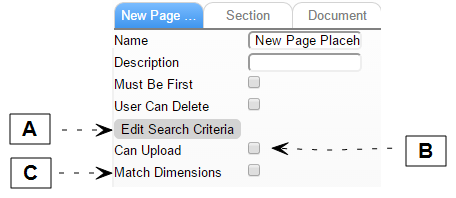
| Name | Description | |
| A | Edit Search Criteria | This option allows you to restrict which items in the content library can be chosen when a user orders this document. Example Let's say you have a holiday postcard, and you want to allow the user to choose from the content library. However, if you want to ensure that only shared documents that are in the "holiday" category can be selected. By restricting the search criteria, you ensure that when the user orders this document only document in the "Holiday" category will be available. |
| B | Can Upload | When enabled, this option allows users that order the document both choose items from the document library and to upload documents from their desktop. Why would I allow this? Going back to our Pitchbook example, users ordering the document usually have a page or two they need to include to ensure the document speaks to their target audience. By enabling the "Can Upload" option, you empower your users to add pages that will target their audience, while at the same time offering the wealth of information available in the content library. |
